Categories
Creating your own plugins for WordPress
WordPress is one of the most widely used content management systems (CMS) for managing and creating websites. Its user-friendly interface and extensive functionality make it a popular choice for both beginners and advanced users. One of the most powerful features of WordPress is the ability to develop plug-ins, which allow you to extend the functionality of a website. In this article, we will explain how to create your own WordPress plug-in, from idea to publication.
Step 1: Define your Idea
Before you start coding a plug-in, it is important to have a clear idea of what you want to achieve. Consider the following questions:
- What problem do you want to solve?
- What functionality will your plug-in provide?
- Is there a specific customer need you want to fulfill?
Work your idea into a plan of action and create a timeline for the development of your plug-in. Determine which features are essential and which you may want to add in later updates.
Step 2: Preparation and Technologies Needed
To develop a WordPress plug-in, you need basic knowledge of the following programming languages:
- PHP: The core of WordPress is written in PHP.
- HTML: For building the structure of your plug-in.
- CSS: For formatting and styling.
- JavaScript: For dynamic and interactive elements.
Step 3: Starting to code
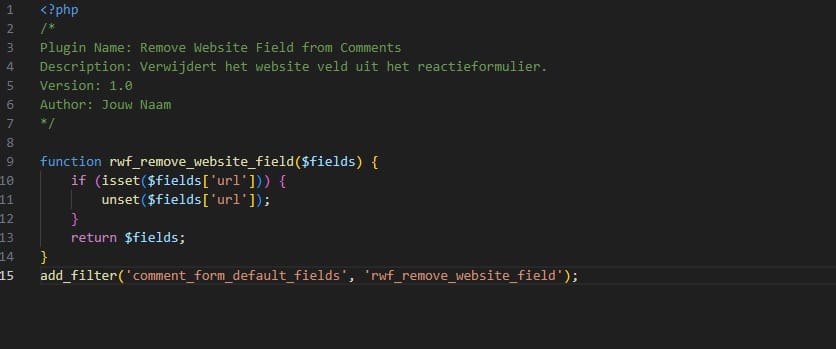
As an example, we'll create a simple plug-in that removes the website field from the response form. This field is often abused by spammers and adds little value for most websites.
Create a folder for your plug-in:
- Create a folder in the
wp-content/pluginsdirectory of your WordPress installation. For example, name this folderremove-website-field.
- Create a folder in the
Create the main PHP file:
- In the created folder, create a file named
remove-website-field.php. - Add the following code to this file:
- In the created folder, create a file named

This code removes the website field from the response form and registers the plug-in with WordPress.
Step 4: Test your Plug-in.
Before using the plug-in on a live site, it is crucial to test it extensively on a development environment. At MijnHostingPartner.nl, you can easily create a subdomain and install a separate WordPress website on it. This ensures that your production website stays clean and operational while you experiment to your heart's content.
Step 5: Publish your plug-in
Once you are satisfied with the performance of your plug-in and have tested it extensively, consider publishing it to the WordPress Plug-in Directory. To do this, follow the steps below:
- Create a WordPress.org account: You need this to upload plug-ins.
- Read the guidelines: Make sure your plug-in meets the WordPress guidelines.
- Upload your plugin: Follow the instructions on the WordPress Plugin Developer Handbook to upload your plugin.
Once approved by WordPress reviewers, your plug-in will be published and made available to all WordPress users. Keep in mind that plug-ins in the directory are open source, but you can offer a premium version for additional features.
Step 6: Maintenance and Updates.
The work doesn't stop after publishing your plugin. Listen to user feedback, respond to questions and update your plug-in regularly. Regular updates ensure a good user experience and keep your plug-in secure and reliable.
- Version control: Keep track of the changes you make and make sure you always have a backup of previous versions. This makes it easier to revert to a previous version if problems arise.
- Customer service: Respond quickly and appropriately to user questions and feedback. This builds trust and helps improve your plugin.