Categories
Setting up your email - Outlook 2013
Email setup - Outlook via control panel
To set up your mail in Outlook 2013 follow the steps below:
1) You open Outlook 2013
2 ) You click on the tab'File' in the upper left corner of your screen.
3 ) Then you click'AddAccount'.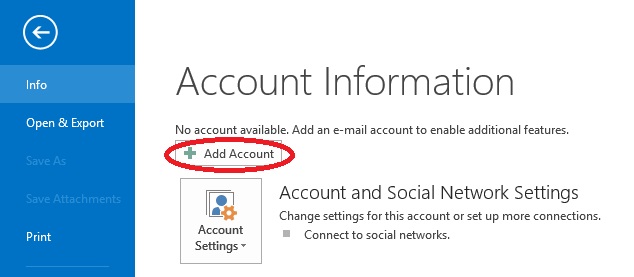
4 ) Then click on'Manually setup or additional server types' and then on'Next'.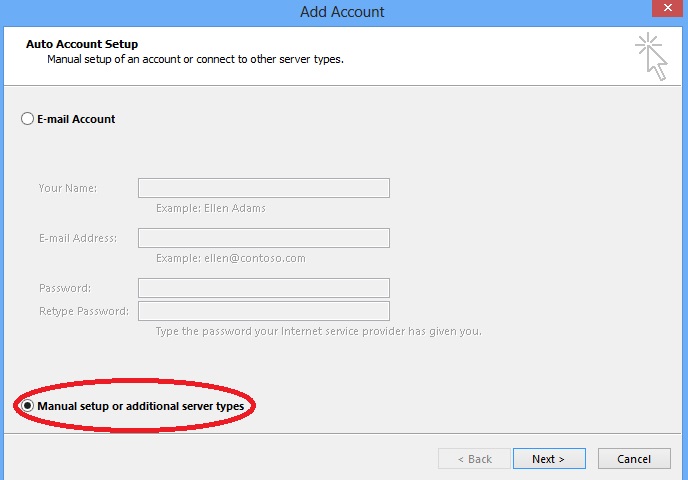
5 ) In this screen you have the choice to setup your mail as POP3 Account or as IMAP.
- POP3 -> You pull all mail from the server towards your mail client. you then decide what to do with the mail next. The mail does not remain on the server. Continue with point 5.1 to 5.5.

- IMAP -> You synchronise your mail. Mail and folders on the server correspond to your mail client. Mail remains on the server and you can access all your correspondence via the webmail. Continue with point 6.1 to 6.5.
5.1) If you choose POP3 then you fill in the following settings:

a. Your name - this is visible to others when you send an email.
b. Here you fill in your full mail address.
c. Here you enter'pop.myhostingpartner.co.uk'.
d. Here you fill in ALWAYS smtp.mijnhostingpartner.nl! So not the smtp server of your internet provider!
e. In this field you enter the full mail address that you are configuring.
f. In the password field you enter the password that belongs to the mail address. You have entered this yourself via the control panel.
5.2) Then click on'More Settings' in the lower right corner.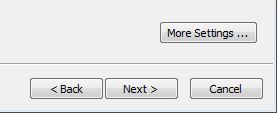
5.3) In the next screen you have a number of tabs. On the first general tab you can enter some other information. This is not required and you can leave it empty. You click on the second tab'OutgoingServer'.
In this tab you check 'My outgoing server (SMTP) requires authentication'.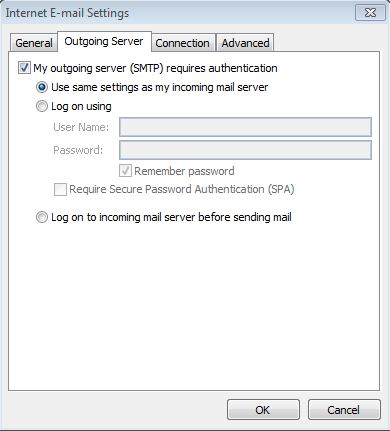
5.4) You are now almost done configuring your mail. You click'OK' after which you will return to the overview screen. If you then click'Next' your account settings will be checked. If all check marks are green you have successfully installed your mail!
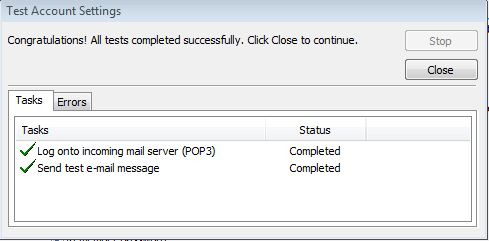
5.5) Now click'Close' and'Next' and 'Congratulations, you have successfully installed your mail! Finally click'Finish' and you are all set to start using your mail account.
6.1) If you choose for IMAP then you fill in the following settings:
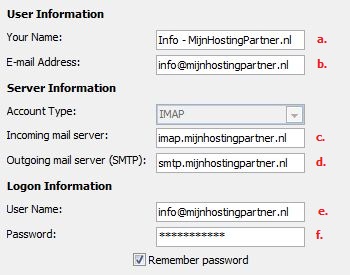
a. Your name - this is visible to others when you send mail.
b. Here you fill in your full mail address.
c. Here you enter'imap.myhostingpartner.nl'.
d. Here you ALWAYS enter smtp.mijnhostingpartner.nl ! So not the smtp server of your internet provider!
e. In this field you enter the full mail address that you are configuring.
f. In the password field you enter the password that belongs to the mail address. You have entered this yourself via the control panel.
6.2) Then click in the lower right corner on'More Settings'.

6.3 ) In the next screen you have a number of tabs. In the general tab you can enter some other information if you wish. This is not required and you can just leave it blank. You click on the tab'Outgoing Server'.
In this tab you check 'My outgoing server (SMTP) requires authentication'.
6.4) You are now almost done setting up your mail. You click 'OK' after which you return to the overview screen. If you then click 'Next' your account settings will be checked. If all check marks are green you have successfully installed your mail!
6.5) Now click 'Close' and 'Next' and 'Congratulations, you have successfully installed your mail! Finally click on 'Finish' and you are all set to start using your mail account.
7.0) If port 25 SMTP is blocked by your internet provider you need to take the following steps.
You go to the'Account settings'. Select your email account and click'Change'.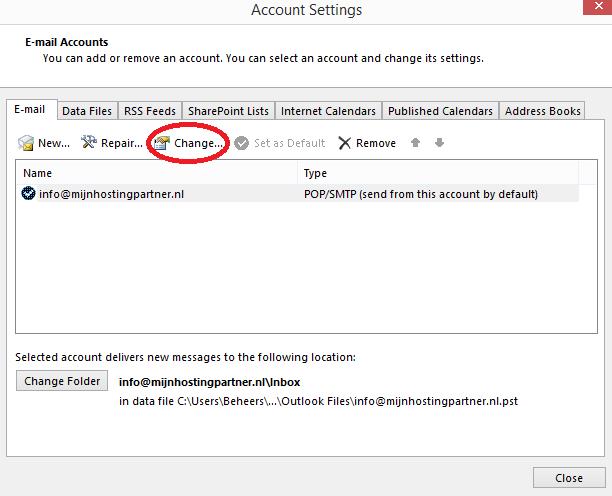
The window below will open. Click on'More Settings'.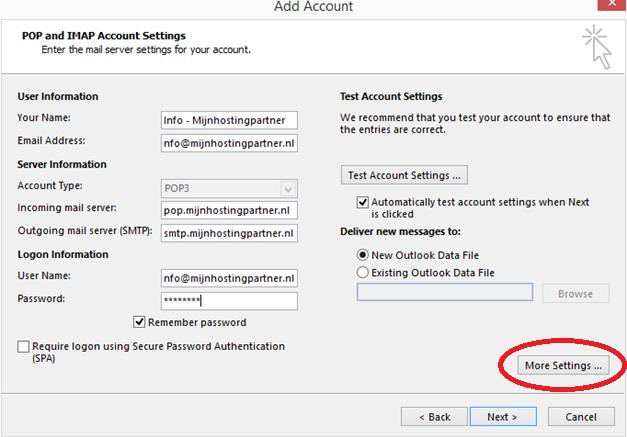
Click on the'Advanced tab'.
At 'Outgoing server (SMTP)' it now says 25, you need to change this to 26.
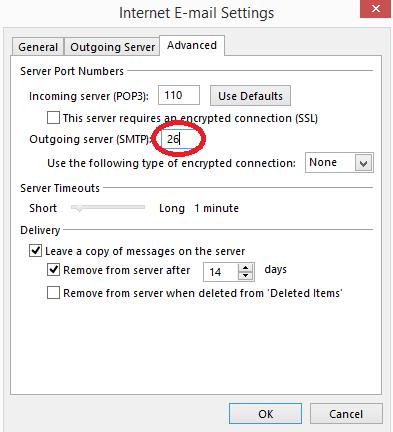
Then click'OK'.
NB. If there is an unexpected error in this article we would appreciate it if you would report this. We will then adjust it. We thank you in advance for your efforts and input.
Note:
If you can't find your way out of the article above and we take over your screen to serve you further we reserve the right to charge for this. MijnHostingPartner.nl has a very high service level but does not feel responsible to solve problems caused by situations beyond our control. If a service employee feels that the work will take longer than 5-10 minutes they can indicate that charges will be applied. The service employee will then agree a fixed amount with you. You should take into account € 25.00 excl. VAT per 15 minutes. If you have questions about this, you can ask the helpdesk employee directly.