WordPress rewrite rules in the web configuration file
If you are running a WordPress website on a server that is use Microsoft's IIS web server, then editing the web.config file to make sure that everything works optimally. works. Since we at MijnHostingPartner.co.uk use IIS, there are therefore are often some adjustments in this to check. In this article we will discuss three three common operations that you can perform in the web.config file of a a WordPress website on an IIS hosting: setting rewrite rules for permalinks, redirecting requests to HTTPS, and setting MIME types. Let's continue in this blog and learn how to set this up on your website Website Setup.
Setting up permalinks with rewrite rules
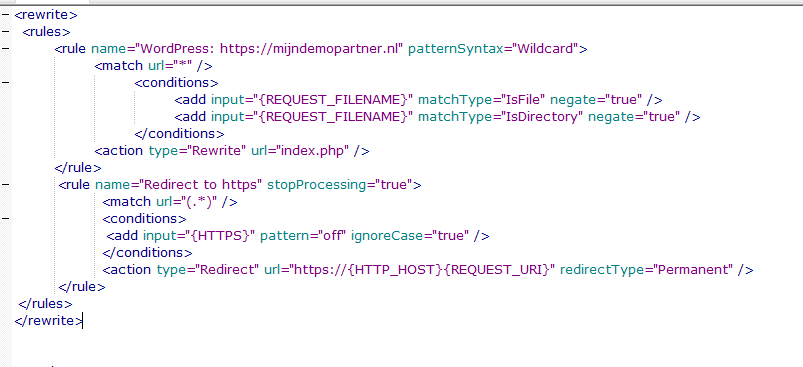
Permalinks are an important part of WordPress because they provide a better URL structure for your website, making it more optimized for search engines and more user-friendly for your visitors. If you use permalinks incorrectly on a WordPress website running IIS is running, you may see 404 errors or the links may not work properly work properly. To solve this problem, you can add rewrite rules in the web.config file. This will ensure that the website uses readable or pretty URLs are used, which can also be easily set in WordPress itself. In the following, we will first use the rewrite rules that can be used directly in the web.config file can be used:

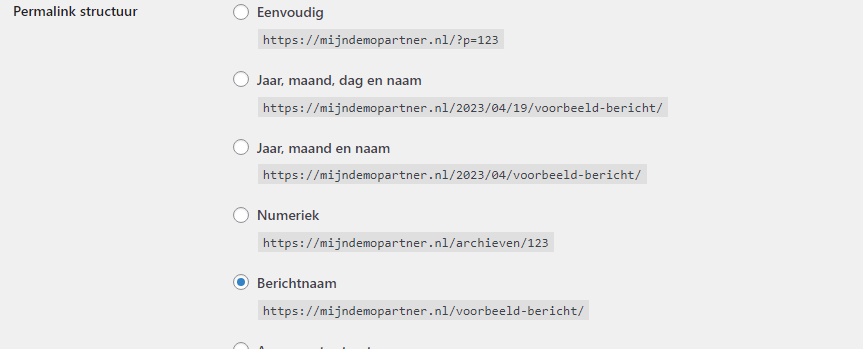
With these default rules, your WordPress pages can be rewritten in be read without 404 notifications, and Google also indexes them as readable URLs. This looks not only nicer for your visitors, but also nicer for yourself. Finally, you simply have /title-of-blog-post instead of /?p=1233 or some other construction. You can do this directly via web.config itself, but also via WordPress. To do this, you need to select the following option and save it. The rules will then be added for you.
In WordPress go to Settings -> Permalinks. And then select the following option:

Grant only the necessary write permissions within WordPress. These can be set again briefly in the customer panel.
Redirect to HTTPS
The use of HTTPS is nowadays essential for a secure and reliable website. And is practically mandatory for any website that is that requests any information at all from a visitor. Even a contact form is enough to make this mandatory. Fortunately, at MijnHostingPartner.nl provide a free Lets Encrypt certificate by default under your package. And you can also consider paid options if you want want more security. If you are not yet using HTTPS for your WordPress website under IIS, you can set this up with the following rewrite rules:

Note that these rules take into account that the website will then be redirected to
https://mijndemopartner.nl
, and not to
https://www.mijndemopartner.nl
. So, again, check carefully which URL you have set you have set as your preferred URL in WordPress.
All traffic to your website will then be redirected to the https version of your website, and all the data that a visitor sends to your will then be sent over the wire in encrypted form.
Set MIME types
Sometimes it may be necessary to manually set MIME types for certain file types. for certain file types. This can be done with the following rules:

These rules set the MIME type "image/webp" for files with the extension ".webp". This can be useful if you use images in WebP format on your website, which provides more efficient more efficient compression than JPEG or PNG. If you use WebP files on your website and they are not displayed correctly, this may be due to the Lack of the correct MIME type settings in the web.config file.
Setting the correct MIME types in the web.config file is important to ensure that all the files on your website are displayed and downloaded correctly. Make sure that you set the correct MIME types for the file types you use, and test your site periodically to make sure that to make sure everything is still working properly. You can also make these additions via the Control Panel under Websites -> MIME Types tab. If you want to add a lot of them, it's probably easier to go directly through web.config. simpler.
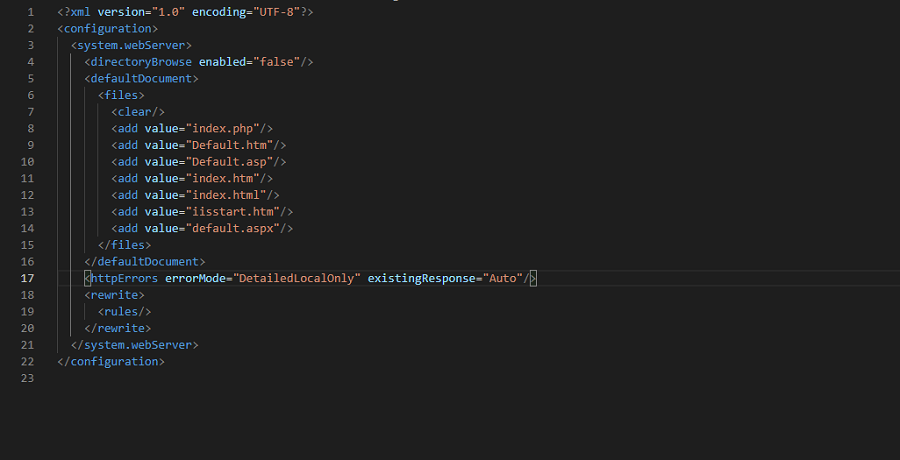
All these rules in the web.config file can be used together in the same file. You just have to make sure that you do not enter anything twice. The rules for the first two points can then for example be combined in the same web.config file:

The order is determined in what comes first, in this case, the nice URLs are processed before the redirection to https.
As always, it is advisable to make a backup of your web.config file before making any changes. If you then make a mistake, you can quickly go back. If you make a mistake in the web.config file, it will cause your website to become unavailable. Website. However, it can always be restored by reinstalling your backup, which can be can be fixed within 2 seconds.
