Add Google Analytics user
Google Analytics is the method used by thousands of webmasters to analyze and optimize their website statistics. Often webmasters already have enough to do such as updating website content, writing it, keeping the website up to date and secure and so on. Therefore, it often happens that there is a colleague present who is hired especially for this purpose to compile reports and to see where more can be achieved within the existing results. Creating an additional user account for Google Analytics is therefore a great solution to share results and keep order in the chaos. In this article we explain how to do this. And how you can benefit from it.
Google Analytics is the tool for tracking your website results, with the integration of other Google products such as Search Console, Google Ads and many other things you can't escape the use of Google Analytics to get the most out of your website in relevance with Google. That is why, after its launch, Google Analytics quickly became the de facto way of tracking website results. Read more about this in this article.
Google Analytics, why add an additional user?
As soon as you are working only for yourself with a hobby website then you will not need to add an additional user. But if you are a member of a company and you work within a team on a website, then you will soon need to add 1 or more accounts for this. This way you can divide the tasks and responsibilities. Google Analytics is an extensive source of information, which often requires some experience to use. There are numerous courses to follow for Google Analytics and it is advisable not to give everyone access just like that. A perusal of Google Analytics records by competitors, for example, can mean disaster for your website. That is why everyone in the online marketing world keeps their cards close to their chest. And so should you.
Precisely for these reasons you can also determine what a user has rights to, is this for example also creating other accounts, or only reading the results. With Google Analytics and the hosting of MijnHostingPartner.nl it is always possible to set multiple layers for this. For example, you can prevent an intern or freelancer from having free reign to do whatever they want.
Adding a user within Google Analytics
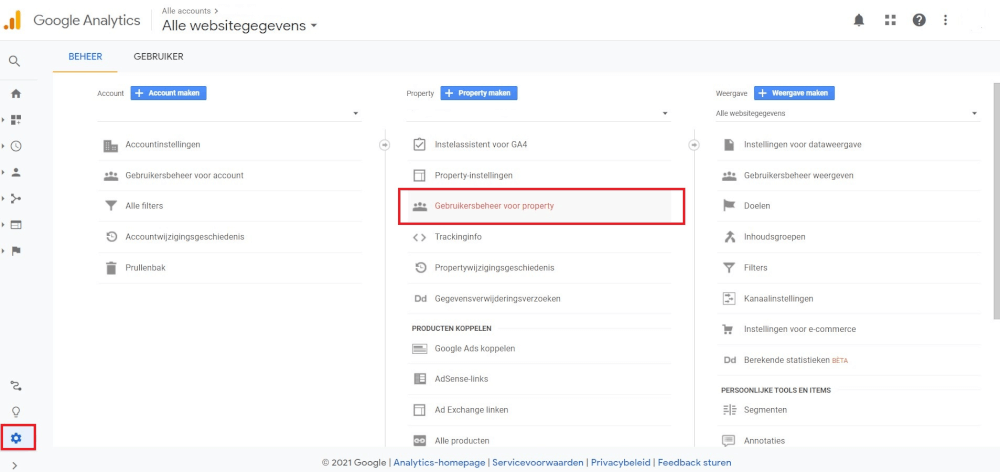
Now the actual steps to add a user within Google Analytics, for this go to your Google Analytics dashboard and go to the settings. You can do that in the following way:

After this, select the following setting to navigate to the appropriate screen, and add the user with the settings that you want and want to assign to the new user. The new user needs an email address, this can be from Google but also an email address of, for example, a company or organization.

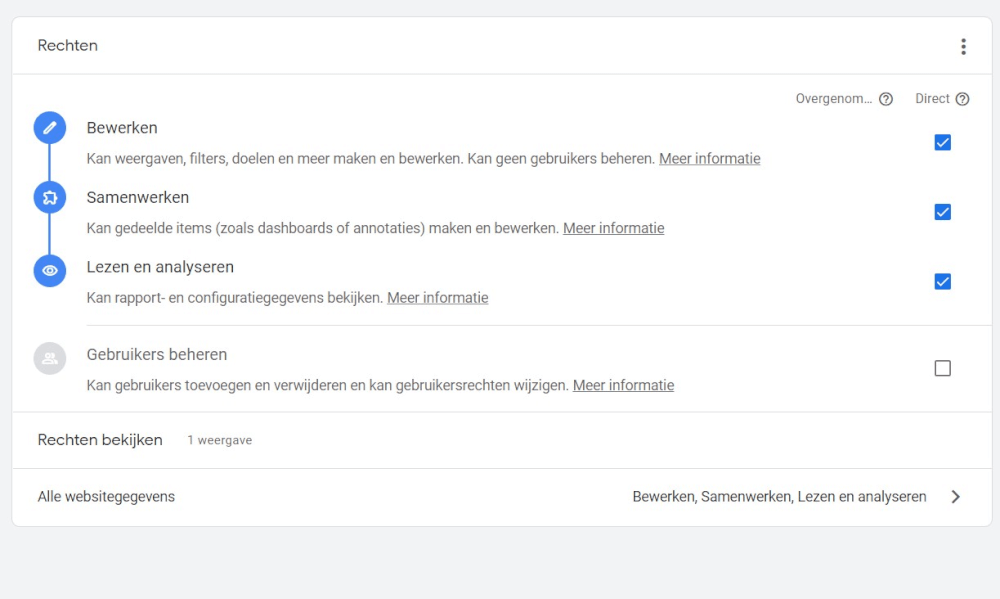
After entering the email address the rights can be given to the account, for this example I want to have access to everything. But not to creating other user accounts. This is better to keep in hand. So I select this in the options. If there is more that should be allowed or not. Then this is the place to further manage.

And the user is now added! Immediately an email is received with further instructions, and you can get started right away.
Stop and remove access of a Google Analytics user
When a colleague leaves the project or the company, one of the first things to do is to stop all access to the data. Within our webhosting this can be arranged perfectly by, for example, putting a mail account on non active. Or completely disable it while still providing access to the content for the administrators. A Google Analytics user can be stopped by navigating to the user accounts and simply removing access to it. This is done by selecting it in the overview and then deleting it with the red button. After this, the access will expire, and any rights will be taken away immediately.
These are the ways to manage, add and remove Google Analytics accounts. So always be careful with this and keep an eye on who has access to what. With each new colleague it is an idea to keep a list of what access has been granted. And after the collaboration stops delete this or immediately change the passwords. This will prevent a lot of trouble.